Search This Blog

Saturday, January 28, 2017

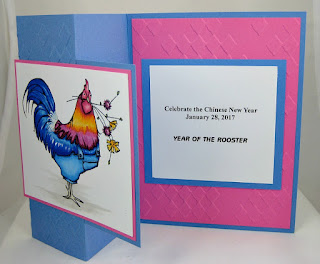
Year of the Rooster!!

 Happy Chinese New Year!

This image is from 
- definitely one of my favorite digis!  Love the Asters that balance his tail feathers and those Farmer Johns are so unexpected!

The fold is a simple Z-fold and the background CS has been embossed with a folder from Cuttlebug.

Copics were used to color the image - I had no idea how to do a realistic rooster and this is what I came up with...

What??  You don't believe I captured the colors right??  Take a peak at the photo of my inspiration rooster on the bottom right!
The inside sentiment was simply
 typed out on my computer.

Inspiration Photo of
actual rooster.


This card should be eligible 
for the following CHALLENGES:

Crafting From the Heart -#144 – ATG Always [DT Favorite]
Incy Wincy Designs – Man in my life
Tuesday Throwdown #327 – ATG
Simon Says Wed – ATG
Penny's Challenge #313 – ATG
A Day for Daisies #158 – 2 or More Layers
Crafty Creations - #333 – ATG
AI Challenge #200 – Spring Colors
Winter Wonderland – Spring Fever [Sun, Flowers, Romance]
Scrapper's Delight #62 – ATG Always
Aurora Wings #42 – Asian Inspired
Get Creative Challenges – #54 ATG Always
Aud Sentiments #172 – Male card + Sent
As You Like It – Favorite Flower & Why [small purple Asters so hardy and beautiful!]


Create wildly and color with abandon!  ~ginny

Friday, January 27, 2017

Repeat design - different uses...

"Warmest Wishes" can be found
at Mo's Digital Pencil Too
Last post I made was a tutorial on how to use this design as a gift card holder - here I used the same concept as a pop-up birthday celebration.

This image is by Mo Manning. The punch for the balloons is from SU and I used DP as well as vellum.  Each is double sided with a thin strip of acetate glued between them and then stuck into the slot that would hold the gift card on my earlier project.  Corners on the focal image were made with a Corner Chomper, the sentiment is by Hero Arts and the top portion of a tag die was used to cut the opening in the pop-up.
As this is for a male relative - no extra frou-frou was used.


This card should be eligible 
for the following CHALLENGES:

Through the Craftroom Door – ATG Always
Incy Wincy Designs – Man in my life
Crafty Sentiments – Use Dies [opening in the pop-up]
Tuesday Throwdown #327 – ATG
DP2 -Mo's Challenge Blog #271 - ATG + Mo Image
Simon Says Wed – ATG
Penny's Challenge #313 – ATG
Inspiration Destination #120 – ATG
Crafty Girls Creations – #32 ATG Always
Crafty Hazelnut's Patterned Paper Challenge – Always ATG + DP
Crafty Creations - #333 – ATG
Art by MiRan Challenge #74 – ATG
Scrapper's Delight #62 – ATG Always
Get Creative Challenges – #54 ATG Always
Aud Sentiments #172 – Male card + Sent TOP FIVE

Create wildly and color with abandon!  ~ginny

Sunday, January 1, 2017

Totally Technical...

The monthly January challenge for 613 Ave C is "Totally Technical" - the idea is to create a project using your favorite technique.  This will be a fun post to check out at the link I provided above.  The DT will each have a technique to highlight for you... so ideas galore!
I have two favorites... using alcohol inks and construction - [card construction or image construction as in Paper Sculpting.]
The Copic coloring of this image was done with the colors pictured :

Today I chose to highlight a card construction technique creating a Pop-up Gift Card holder.  The idea is from Sandy Allnock's  Dec. 14th post called "Pop-up Gift Card Holder" and Sandy attributes the idea back to a post by Lyssa Zwolanke.  I have linked to both posts if you want to see the original instructions or great videos to explain the process.  Although I used the basic construction concepts, I made my card into an A2 size card instead of the smaller 4.5 x 4.25 version.

This is the final product - instructions  and photos below.


* Start with a standard 8.5 x 11" sheet of CS  & cut the sheet lengthwise so it will be 4.25 x 11".
* Score it at 4.5", 5.5" & 6.5" from the narrow end.


* Fold the 3 score lines to create a valley, mountain, valley fold.


* Use very strong tape [like a red liner double sided tape] placed at the very bottom edge of the INSIDE of the V to hold it together.  Burnish it well to make sure it connects & sticks.

This photo is showing the tape I used, but the CS would be flipped over so you can tape the inside of the mountain fold together.


* Flip the panel over and use a punch or die  to cut a narrow opening sized to the length of the gift card.  Here I used my punch upside down to visualize placement.  If the punch or die is not long enough for your card, simply use an exacto and slit open the necessary distance on each side.


*I then decorated the side panels and glued it down to the inside of my regular A2 size card.


Oh my gosh!  So quick & easy and so cute when it pops up!

This card should be eligible for the following 
CHALLENGES:
Through the Craftroom Door – ATG Always
Inspiration Destination #116 – ATG
Penny's Challenge #309 – ATG
Art by MiRan Challenge #74 – ATG
Work it Wed. / Simon Says Stamp – Use a Die
Crafty Girls Creations – #32 ATG Always

Create wildly and color with abandon!  ~ginny