Search This Blog

Wednesday, May 22, 2019

Retirement...


This is a combined retirement and birthday card for a sailing buddy of mine.  Sitting on a bench and feeding the birds is the last thing she would consider doing in retirement - she will more likely be skiing, snowmobiling, and sky jumping for all I know!  But I love this Mo Manning image [I think it is called "Feed the Soul"] & I opted to use it with an apology on the inside.

  PROCESS:  I sketched in the wooden fence in the background - I pictured her on the beach near the Cliff House in San Francisco, thus the sandy area around her.  In my mind, the ocean is crashing on the beach just over that retaining wall.  I colored this with Copics [listed below], Prismacolor Pencils and blended Distress Inks off a handmade stencil for the sky and clouds.  The image panel was matted on black linen CS & layered on a favorite designer paper that has been hoarded in my stash for far too long.  A short piece of matching blue satin ribbon, folded and given a fishtail cut on the ends, was tucked under the mat.  The final layer is a 6.5'' x 5.5'' black linen base card.
Copics used: 
E33, 34, 35, 37, 39, 41, 42, 43, 50, 53
W 00, 1, 3
N 0,1, 5
C 0, 1, 3, 5
YG 0000, 25, 67
YR 18
BG 0000, 000, 01, 02, 05


Create wildly and color with abandon!  
~ginny

CHALLENGES:
Crafting From the Heart - #243 ATG Always
Penny's Challenge #431 – ATG Always
Crafty Sentiments – ATG
Through the Craft Room Door - ATG Always
Papercraft Challenge #37 – Ribbons
Simon Says Wed – Bright Colors
Mo's Digital Pencil #279 – ATG w/ Mo's /Optional: for the Girls
Get Creative Challenges – #80 – ATG – no twist
A Place to Start – Fave Technique – [Coloring with Copics & Prismacolor Pencils]
Crafty Hazelnut's DP Challenge – Always ATG
Oddball Art – ATG
Incy Wincy Designs – Embellishment [Ribbon]
SheepSki Designs #26 – Flower Power
Tuesday Throwdown #432 – Stenciling [handmade Cloud stencil]
Creative Playground [Imagine That ] Challenge #5: ATG
Crafty Creations - #391 – ATG Always

Sunday, May 5, 2019

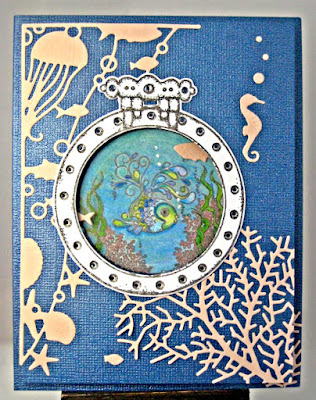
Underwater Shaker...


There is a new 613 Ave C  challenge starting May 5th:  "ATG/ optional Twist: "Shaker Card."  You have the month of May to show your creative talents!   For details of the challenge and for some very creative ideas from the DT's inspirational contributions -  click HERE!

 Not sure why - but my brain went into a state of panic over this challenge... I definitely put in more hours thinking about it, looking up techniques on the net and talking to fellow makers than the actual construction took.  I guess the moral of the story is for me to put more thinking in during construction - there was a major oops... I hope you can learn from my mistake!  If you just want the mistakes... skip the "Process" and scroll down to the RED Heading.
So, here is my process:
  • Create an A2 base card: [Cut 8.5 x 11" CS to 5.5 x 8.5", score and fold to an A2 size of 4.25 x 5.5"]
  • From remaining CS cut a 4 x 5.25" layer to fit on top
  • Two layers of "Fun Foam" [Dollar Store]  cut to 3.75 x 5" with both sides of each having Double Sticky Tape [Roll from Elizabeth Craft Designs]  
  • Used a 2.5" circle die ["Stitched Circle Stackables by Lawn Fawn] to cut a hole in the top layer, taking into consideration where my design elements will fit.
  • Determined exactly where my foam will fit and penciled in a circle thru the hole in the top layer.  Die cut a 2.5" hole in each of the 2 foam layers so that they match the hole in the top layer.
  • Removed the release paper from one side each of the two foam pieces and attached them to each other - making a thicker spacer.
  • I decorated using the following: Dies "Oceana Corner" and "Delicate Sea Fan" - both from Memory Box.  Rubber stamps and matching Dies for the porthole frame & the fish scene [colored with Prismacolor Pencils] from "Coral Reef Collage" by Heartfelt Creations.
  • Assembly: Placing the top layer where I wanted it over the base card, I was able to simply place the fish scene thru the window & stick it down in exactly the right spot.
  • Next Acetate was taped down on the back side of the Top Layer.
OK - here is where I went wrong. 
  • I intended to stick the foam layers around the Fish Scene on the Base Card.  I wanted a wall to surround the Fish Scene to hold all of my beads for the Shaker.  I stuck the foam on the bottom of the top layer instead - Dam_!  
  • I did use an Embossing Buddy to apply powder to the inside of the well of foam... this was to prevent beads from sticking to the inside walls.  But, now I have powder all over the acetate window.  Dam_!
  • Now used a Swiffer pad to wipe it clean so as not to scratch it.
  • Next, it is time to add the beads, 7 blue-green iridescent sequins & 3 tiny fish.  Have you ever tried to pile round beads in the center of a flat piece of paper??!  Dam_!
  • I carefully place the Top Layer with the foam on it down over the beads - success! 
  • I took it to show to hubby and grinning, he eagerly shook it vigorously!
  • I looked at it and found all 7 of the sequins are missing as are about half the beads and 2.5 fish.  Looking carefully I see the beads all stuck to the sides of the foam, no sequins to be seen.  Dam_!   Did the Swiffer remove the powder from the adhesive too?  Or not enough powder used?
Next time the foam will go on the base, baby powder will be sprinkled liberally, and more beads will be used.  Heavy sigh... I photographed it anyway!

Create wildly and color with abandon!  
~ginny

CHALLENGES:
Crafty Creations - #389 – ATG Always
Penny's Challenge #428 – ATG Always
Through the Craft Room Door - ATG Always
Crafting with Friends #3 – ATG
Sweet Stampin' – ATG or Spaced Out
Crafting From the Heart - #240 ATG Always
Get Creative Challenges – #80 – ATG – no twist