Search This Blog

Sunday, August 31, 2014

Sights, Sounds & Tastes of Autumn...

Melonheadz provided the images for this project
This project started with the background that my friend Betty taught us in our Stampers club- "Stampe Diem".  I will describe that under 'Techniques' below. Thanks Betty & Diane for the idea and the help!
Starting today and running thru Sat. 9/6, 613 Ave C has challenged us to the "Sights, sounds, tastes of Autumn". 
My DT mates have created all kinds of takes on the theme which I know you will enjoy - so click on 613 Ave Create to see the examples.  You can enter three of your own takes to be eligible for a prize from one of the two sponsors - Melonheadz and Meljen's Designs.  Have fun!
TECHNIQUE
[Note: specific information on supplies and sources will be found below under “Supplies”.]
Thank you Betty A for the marvelous tutorial you gave us!
The following is my attempt to explain her steps for the "Quilted Background":
  • An 8.5 x 11" sheet of scrap CS was run thru a Xyron to apply adhesive.  That was cut into quarter pieces A2 size so we could make four different backgrounds.
  • Use up your scrap DP [YEA!] and pick out six coordinating colors of scrap DP for this project.
  • Using a I" square EK punch, punch six little squares from the six papers.
  • Carefully peel back the protective sheet covering the adhesive and start laying down the squares in your desired design.  Some were applying colors in a random way to create a "Crazy Quilt" design - on this one, the squares were turned 90 degrees and layed down point to point creating a diamond pattern.
  • As you complete one row, peel back more of the protective sheet and completely fill in the A2 CS.  When done there will be DP hanging over the edge - simply cut those away to clean up your edges.
  • Now is the fun part - using an embossing folder run the whole piece thru your Cuttlebug or what ever machine you have... if you look closely you can see I used an E-folder with tall grasses [to me it looks like wheat] growing up from the bottom.  This not only gives it texture but helps seal the 1" squares to the adhesive.  Cool, eh?
  • Now to the rest of my card: using my background, I chose coordinating colors for my three images and colored all three with Copics.  Images were fussy cut, edges colored with a dark grey and then each was adhered at three different levels.  The banner is attached directly to the background, the scarecrow is elevated on one layer of foam tape, and the third piece, the apple basket, is brought forward by using a double layer of foam tape.
  • Inside was finished very simply utilizing the two strips cut off the edges of the background. 

This card should be eligible for the following 
CHALLENGES:
Crafting from the Heart #33 – ATG
Tuesday Throwdown #210 – ATG
Clear It Out – Fave Color Combo/ stash: ATG [oranges & blues with beige stash: scraps]
Through the Craft Room Door – ATG
Top Tip Tues – ATG
Simon Says Wed – ATG
Sweet Stampin' – Embossing [background embossed in the technique]
Art by MiRan Challenge #13 – ATG
Ppinkydolls #1 – ATG /optional twist - ATG
Sweet Pea Stampers – Use lots of Layers [four used here]
Robyn's Fetish #227 – Use a Digi
Pile It On #35 - Punch It Out [background is punched with 1" squares] SUPPLIES
IMAGES:  The focal images are from Melonheadz
Sentiment is Hero Arts - "Friendship Messages"
PAPER:  Neenah Classic Crest Solar White 80# Cover Wt. used for the images; Base CS is from stash.
EMBELLISHMENTS: EK punch used for the squares; Cuttlebug E-folder and machine used to emboss the background.
INKS: the images were printed on an  Epson WF3520 printer & colored with Copics:


Create wildly and color with abandon!  ~ginny

Sunday, August 24, 2014

Reese's Skateboard...


 Grandson's Birthday coming up - not till late October, but I found this image from Mayze Art that I think is perfect for him.  I have RARELY had any card done two months in advance - I will probably lose it of forget I have it!  
He is of an age where I must be careful not to have anything girly on it... so this is for "manly men" only!
 TECHNIQUE
[Note: specific information on supplies and sources will be found below under “Supplies”.]
  • A2 size card base
  • Image colored with Copics and matted with the solid brown CS after wrapping it with twine.
  • Used a Micron pen to doodle the helmet's graphics.
  • Buttons threaded with twine and knotted on top
  • Two more coordinating DPs rescued from stash and layered on the card front.
  • Inside uses leftover papers from the front.


inside
This card should be eligible for the following 
CHALLENGES:
Clear It Out - ATG)/Stash: ATG
The East Wind – #13 – for the Kiddies
Open-Minded Crafting  - #17 – Last Days of Summer
Robyn's Fetish #226 – Cards for Men
Copic Marker Spain- Summer or Vacation
One Sweet Challenge – Turn Up the Heat
Top Tip Tues – ATG
Fab and Funky #226 – For the Kids
Art by MiRan Challenge #13 – ATG

SUPPLIES

IMAGES:  The focal image is from Mayze Art; 
Sentiment is  ??
PAPER:  Neenah Classic Crest Solar White 80# Cover Wt. used for the images; Base CS from stash DP for the mats are  from Generations Paper & Card Stock Stackers Nature Colors.
EMBELLISHMENTS: Baker's twine used at the top of the focal panel and also threaded thru and knotted on top of the three tiny buttons - all from stash; a black Micron Pen was used to doodle graphics on the helmet.
INKS: The images were printed on an Epson WF3520 printer & colored with Copics: B0000, B000, B01, YR0000, YR12, YR15, YR18, YR23, YR24, N0, N1, N3, E0000, E000, E0, W00, W1.

Create wildly and color with abandon!  ~ginny

Thursday, August 21, 2014

Frozen...


"Frozen Heart Sassy" provided by Sassy Studio Designs


Aud Sentiments is challenging you to "Make a Project for Your Favorite Season".  This is one of the two images provided from the sponsor - Sassy Studio Designs - both are from the movie Frozen which I have not seen... love the freckles on her, don't you?!  I have heard the song, [who hasn't!] and so I chose this sentiment from Marie-Clare to use with her.  The challenge runs til 8/26 and you are allowed 5 entries - pretty good odds for winning a prize, don't ya think?  Check out what the rest of my mates have done with the images... it always amazes me that there are so many different ways to go for the same image!

TECHNIQUE
[Note: specific information on supplies and sources will be found below under “Supplies”.]

  • A2 size base card
  • Image colored with Copics & double matted.
  • Scraps of blue polka dot paper left over from a class were used for the edge strip, the 2nd layer of the heart and for the inside.
  • White scrap CS was punched with the snowflakes and added to extend off the left fold and for the inside.
  • The sentiment was double matted using a heart punch and then three scraps left from the snowflake punch were adhered on top for embellishment.
Inside
This card should be eligible for the following 
CHALLENGES:
Art by MiRan Challenge #12 – ATG
Crafting from the Heart #32 – ATG
Through the Craft Room Door – ATG
Sweet Stamps #183 – ATG
Clear It Out - ATG)/Stash: ATG [scraps]
Top Tip Tues – ATG


SUPPLIES

IMAGES:  The focal image is from Sassy Studio DesignsSentiment is by MC from Cards by MC
PAPER:  Neenah Classic Crest Solar White 80# Cover Wt. used for the images; Base CS & mats are stash; polka dot DP - I think is SU.
EMBELLISHMENTS: EK punch used for the snowflakes; sentiment heart and the mats punched with a Carl
INKS:  the image was printed on an Epson WF3520 printer & colored with Copics:


Create wildly and color with abandon!  ~ginny

Sunday, August 17, 2014

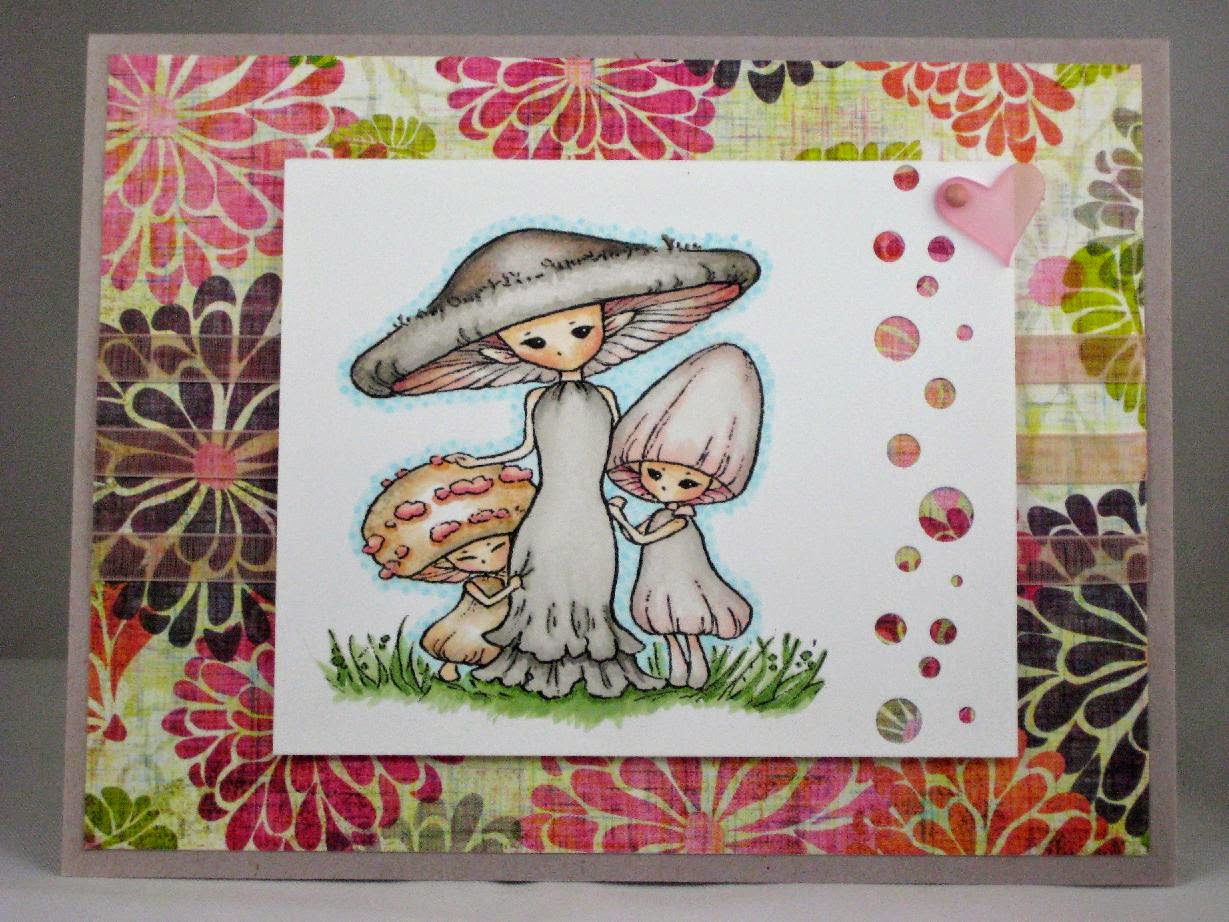
Mushroom Family...

"Mushroom Digi" provided by Aurora Wings

Sometimes when I am just browsing, an image makes me 
come to an abrupt stop... this is one of them.  Sweet, innocent, 
quirky, depicting familial love -  I love it to pieces! 

This is my choice for the new Anything Goes Challenge at 613 Ave C 
starting today.  Aurora Wings & Dr. Digi are the two sponsors this go
around - so there will be two prizes available... and if you follow the 
link you can see what the rest of the DT have created with their images!
You can submit up to three entries and you have one week from today.  
TECHNIQUE
[Note: specific information on supplies and sources will be found below under “Supplies”.]
  • A2 card size with a top fold
  • This is one of the few images that I colored first with my Copics before I chose a background.  I wasn't sure where my colors would end up and I wanted that freedom. They ended up much more sedate than I thought they would - so I went wild with the DP.

  • I wanted minimal distraction in terms of embellishments considering the wild and wonderful colors in the Basic Grey DP background - so I chose a bubble border punch, three stripes of shear pink ribbon [across the background paper] and a single, see thru acrylic, pink heart held in place with a pink brad.
  • To bring color under the bubbles I cut a small strip of the DP and taped it in place under the image panel in such a way that I got maximum color showing thru.  That panel was then elevated on the background using foam tape. 
  • Inside
  • The inside uses extra papers from the front with the bubble punch used again on the DP strip on the message panel.
CHALLENGES:
Crafting from the Heart #31 – ATG
Fab and Funky #225 – Inspired by a Movie [Attack of the Mushroom People]
MarkerPOP Challenge #49 – ATG
Sisterhood of Crafters – Your Favorite Color [pinks & greys]
Through the Craft Room Door –ATG
Sweet Stamps #182 – In the Garden
Crafty Sentiments – ATG
Paper Shelter #169 – Punches and Dies [Bubble punch]
Simon Says Wed – Summer
Art by MiRan Challenge #12 – ATG WINNER
Divas by Design – Use Charms [heart]
Open-Minded Crafting  - #17 – Last Days of Summer

SUPPLIES
IMAGES:  The focal image is from Aurora Wings with the fantasy art of Mitzi Sato-Wiuff!  If you like fantasy - you will want to check out this site - OMG - a colorists' heaven!
PAPER:  Neenah Classic Crest Solar White 80# Cover Wt. used for the images; Base CS is stash; DP is from "Sweet Threads" collection by Basic Grey.
EMBELLISHMENTS: Punch used for the bubble border has no name on it??; ribbon is from stash; pink Heart is a Chic Charma Kissy Fit from Queen and Co.
INKS: The images were printed on an Epson WF3520 printer & colored with Copics - noted in the photo to the right.
Create wildly and color with abandon!  ~ginny

Thursday, August 7, 2014

Need a Hug??

"My Best Boy" provided by ADFD
 When I saw this image from A Day For Daisies [ADFD] it spoke to me... "Need a hug?"  Perfect for the the current Aud Sentiments challenge to create a "Thinking of You Type Sentiment - such as Get Well, Sympathy or for someone going thru a hard time."
ADFD is sponsoring the challenge and there are some wonderful inspiration cards created by the Design Team.  The challenge lasts thru August 12 and you can submit up to 5 images for a chance at the ADFD prize.  You can see the samples, read the rules and enter your card at Aud Sentiments!

 TECHNIQUE
[Note: specific information on supplies and sources will be found below under “Supplies”.]
  • Base card is A2 with left hand fold and upper right corner rounded.
  • Image printed twice, colored with Copicstop layer was fussy cut,  the individual piece sculpted [dry embossed from the back using a large ball tool] and layered with foam tape to maintain the dimension. 
  • Banners cut from Basic Grey's "Little Black Dress" Paper Stack - "anchored" with Candi colored with Copics to match.
  • Computer generated sentiment punched out and mounted on foam tape to match the depth of the focal image.

This card should be eligible for the following 
CHALLENGES:
Fussy & Fancy  #119 – Words
Art by MiRan Challenge #11 – ATG
Sentimental Sunday  #218 – Fave Hair Color Combo [warm greys -W00, W1, W3,]
Robyn's Fetish #223 – Sq. or Rectangle cards
Papertake Weekly – ATG w/ option to use Torn Paper
Crafty Sentiments – Add a Sentiment
Sweet Pea Stampers – Thinking of you/Missing you /Just Because
MarkerPOP Challenge #49 – ATG

SUPPLIES
IMAGES:  The focal image is from ADFD; Sentiment is printed on my computer
PAPER:  Neenah Classic Crest Solar White 80# Cover Wt. used for the images; Base CS is from stash; DP are from Basic Grey's "Little Black Dress".
EMBELLISHMENTS: Crop-a-Dial's Corner Chomper used for the base CS & the image panel; SU Punch used for the sentiment; Candi pieces were colored with Copics to match the warm grey pallette.
INKS: the images were printed on a Canon PIXMA printer & colored with Copics:
E0000, E000, E00, R20, W00, W1, W3, N0, & N01.

Create wildly and color with abandon!  ~ginny

Sunday, August 3, 2014

Friendship Day...


"Queen Bee" provided by Digital Delights
I am making this for my best friend who will soon be celebrating her 3 month checkup with her Oncologist. This last Pet scan should confirm she is "CURED" of her cancer.  The inside is stamped with one of my all time favorite rubber stamps... it reads:  "Never underestimate the power of this woman! 
She has gone from a stage 4, very large and very aggressive anal tumor to nada with a very aggressive chemo and radiation combo!  That and the power of her will!  Here's to you Rainey!


This card fits for the 613 Ave Create Challenge for Friendship Day! [Create something for a friend].  Do check out the makes of my mates on the DT and get the skinny on the rules of the challenge.  Info on the two sponsors [Digital Delights & Lacy Sunshine Stamps] and the prizes will also be found there.  


TECHNIQUE
[Note: specific information on supplies and sources will be found below under “Supplies”.]
  • Starting with A2 size black CS base card with a left side fold and two layers of DP - all corners rounded with a Crop-a-Dial Corner Chomper.
  • On the top layer of DP I used a Cuttlebug strip e-Folder of three flowers.  I inked it up with 'Wild Honey' Distress Ink before embossing with it - making the yellowish trip down the right side.  A black Micron pen was used to make dots in the centers for contrast.
  • The image was colored with Copics and the body, wings and head were sculpted with a 2nd copy of the image, fussy cut and mounted on foam tape as seen to the right.
  • I used duo glue and gold foil on the crown and the multiple white dots & accents were created with Copic Opaque White in a Calligraphy Fineliner pen.
  • Three Candi Dots were placed to balance the composition.
  • The sentiment was stamped on the inside.


This card should be eligible for the following 
CHALLENGES:
Through the Craft Room Door – ATG
Crafting from the Heart #29 – ATG
Sisterhood of Crafters – Punches or Die Cuts
[Crop-a-Dial Corner Chomper Punch]
Clear it Out – Yellows/ stash – Yellow things
Crafty Sentiments – ATG
Divas by Design – ATG
Fab and Funky #224 -  Walk on the Wild Side [animals]
Art by MiRan Challenge #11 – ATG

SUPPLIES
IMAGES:  The focal image is from Digital Delights; Sentiment is Art Impressions
PAPER:  Neenah Classic Crest Solar White 80# Cover Wt. used for the images; Base CS, DP and the mats are from stash.
EMBELLISHMENTS:  Candi Dots are from stash; corner rounder is a Crop-a-Dial "Corner Chomper"
INKS: 'Wild Honey' Distress Ink used to distress all the edges; Copic Opaque White; the images were printed on a Canon PIXMA printer & colored with Copics:


Create wildly and color with abandon!  ~ginny

Sunday, July 27, 2014

Winter Elf...

"Winter Elf" provided by Scrappers' Delight
I love how this one turned out!
613 Ave Create has a new sponsor - Scrappers' Delight for the current challenge.  I fell in love with this little elf from their store and immediately felt using one of the Shaving Cream Technique backgrounds would be quite effective.  Choosing colors from the background to use for her clothes was a no-brainer.
You have got to see the Design Team's artwork for this challenge - fun!
613 Ave C - 
Challenge: to Use a Sentiment
You can submit up to 3 entries in this one till Sat. Aug. 9 - easy one, go for it!
TECHNIQUE
[Note: specific information on supplies and sources will be found below under “Supplies”.]
  • I used a "Paper Sculpting Technique" this time around - using two layers for the head only. It was colored with Copics, fussy cut, sculpted [dry embossed from the back using a large ball tool] and layered with foam tape to maintain the dimension. You can best see the dimension in the close up.
  • Shaving Cream Technique explained fully can be found HERE 
  • Base card is A2 size CS with the fold at the top
  • Background paper sized down, matted on black & layered on base CS - extra strips that were cut off the edges were then adhered to the upper right corner & waxed linen thread was wrapped around the layers between them.
  • Focal image cut in wonky triangle so that image is out of the frame, also matted in black.
  • Die Cut doily slipped under the focal image and all three layers adhered to the prepared background.
  • Finished with the three bling buttons, silver foil on her earring and a sentiment tag attached to the waxed linen thread.
This card should be eligible for the following 
CHALLENGES:
Crafting from the Heart #28 – ATG
Papertake Weekly – It's a Jolly Holiday
Clear it Out – Christmas in July/ stash – Glittery, sparkly things [3 glitz bling at top of image panel]
Crafty Sentiments – Hand Colored Image
Simon Says Wed – Emboss It [image sculpted with embossing]
Jellypark Challenges – Christmas in July
STAMPlorations – Stamps and Glitter
MarkerPOP Challenge #48 – showcase Blues [used Copics BG]
Sisterhood of Crafters – Punches or Die Cuts [Tim Holtz doily]
Fussy & Fancy  #119 – Words- All about the feeling
Art by MiRan Challenge #11 – ATG
Pile it On #30 – Embossing WON
Copic Marker Spain - ATG
SUPPLIES

IMAGES:  The focal image is from Scrappers' Delight ; Sentiment is MiniZ Words
PAPER:  Neenah Classic Crest Solar White 80# Cover Wt. used for the images; DP and the mats are from stash; background hand made.
EMBELLISHMENTS: Tim Holtz punch used for the doily; Bling buttons are stickers from stash; Duo Glue/ foil used on her earring; Navy blue waxed linen thread from stash.
INKS: The images were printed on a Canon PIXMA printer & colored with Copics:


Create wildly and color with abandon!  ~ginny

Thursday, July 24, 2014

Santa's List...

'Santa's List' provided by QKR Stampede
I know, I know, I know!  It's July!  But Aud Sentiments is having a Challenge for "Christmas in July"!  It is inspired by those of us who reach December and panic with having to decorate, make all our cards, make gifts, prepare for guests... oh my!  I am breaking out in a sweat just thinking about it.  So there you have it!  One card done!  LOL!


QKR


You can check out the wonderful Christmas projects made by the other DT and get the details of the prizes offered by the two sponsors at the Aud Sentiments Blog.


TECHNIQUE
[Note: specific information on supplies and sources will be found below under “Supplies”.]

  • Used A2 size card in a 'Z' fold
  • The punched border was adhered to the back of the front panel which has been embossed with a 'Swirl' Cuttlebug E-folder. The inside panel is embossed with 'Dots'.
  • The focal panel and the sentiment are both matted on white and adhered to the front panel.
  • I used a "Paper Sculpting" Technique that consists of: coloring with Copics, fussy cutting different elements of the image, sculpting the individual pieces from the back using a large ball tool and then elevating each with foam tape to maintain the dimension.
  • The inside reads: "Need a hug?"

This card should be eligible for the following 
CHALLENGES:
Sweet Stampin' – Choose Your Own Stamp- use any
Art by MiRan Challenge #10 – ATG
Through the Craft Room Door – ATG
Crafting from the Heart #28 – ATG
Papertake Weekly – It's a Jolly Holiday
Crafty Sentiments – Hand Colored Image
Simon Says Wed – Emboss It
Jellypark Challenges – Christmas in July
Sisterhood of Crafters – Punches or Die Cuts

SUPPLIES
IMAGES:  The focal image is from QKR Stampede; Sentiment was created on my computer. 
PAPER:  Neenah Classic Crest Solar White 80# Cover Wt. used for the images; DP and the mats are from stash.
EMBELLISHMENTS: EK punch used for the border; E-folders 'Swirls' and 'Dots' used on the backgrounds.
INKS: the images were printed on a Canon PIXMA printer & colored with Copics: R22, 24, 27; N0, 1, 3, 5; Y21, 23; E0000, 000, 00 01.
Create wildly and color with abandon!  ~ginny

Sunday, July 20, 2014

Let's Party...

Sassy Studio provided "Birthday Cake Sassy"
The newest challenge at   613 Ave C is 
"PARTY TIME!! "
There are two sponsors [Sassy Studio & Oak Pond Creations] and two prizes available over the 2 week period from Sunday 7/20 to 8/2.  Check out what my talented housemates have created and the rest of the details for the challenge at 613 Ave C.
I love doing redheads with my Copics... so I picked DP & CS that would support my gal!  The edges on those layers have been distressed  & the ribbon "ties" them together.  The DP has numbers on it if you look closely... and that is perfect for a birthday.  I made the image quite large and then punched her out with a scalloped punch so I could easily showcase her head and the cake. Sassy's head is sculpted & elevated for a 2nd layer as are the letters for the sentiment.  Gold foil was added to her earring and every other pearl around the layers of cake - this was done with duo glue and gold foil. Sources can be found below.
Inside
This card should be eligible for the following 
CHALLENGES:
Sisterhood of Crafters – Birthdays
Sweet Stamps #178 – ATG [no InLinkz]
Papertake Weekly – Buttons, Bows &/or Bling - [Bow on cake, gold bling] 
Fussy & Fancy  #118 – It's all about the Girls
Art by MiRan Challenge #10 – ATG
ABC Challenge – P = Pearls [on the cake]
SUPPLIES
IMAGES:  The focal image is from Sassy Studio Designs ; inside sentiment is SavvyStamps; typewriter key letters on front from Hero Arts.
PAPER:  Neenah Classic Crest Solar White 80# Cover Wt. used for the images; DP and the mats are from stash.
EMBELLISHMENTS: An ArtQuest Fine Liner Calligraphy pen was used to deliver the Duo glue and when dry, the foil was pressed into it; scalloped circles made with a Marvy Uchida punch; inside sentiment and mat done with SU punches.
INKS: the images were printed on a Canon PIXMA printer & colored with Copics:

May you create wildly and color with abandon ~ginny

Wednesday, July 16, 2014

Speedy Recovery...


So - do you remember the Shaving Cream and Dye Ink Technique?  I went to a class my friend Nancy held recently - and she had us doing this old technique again... makes for some fabulous backgrounds!  This morning my husband asked me for a get well card for a sailing mate - so I picked up one of the backgrounds and stamped it with this Magenta stamp.  The sentiment is by Sunlight Impressions and the world stamp on the inside is also by Magenta.

TECHNIQUE
[Note: specific information on supplies and sources will be found below under “Supplies”.]


  • Shaving Cream and Dye Ink Technique is done with a foaming shaving cream [a cheap brand] put on a paper plate.  Two or three colors of ink are added in a couple of drops each around the foam and then "stirred" or mixed gently in a swirling pattern.  A 5.25 x 4'' panel of CS is placed face down into the foam, moved around just a little to make sure the face is covered & lifted from the inked foam.  A 2nd sheet of CS is placed face down on the 1st so that the foam is squished between the two and then both are wiped clean with a paper towel.  The ink has already embedded in the paper and amazingly does not smear further when wiped.  You can continue to use the foam on the paper plate till the color is gone or too muddy to use further.  Throw away that plate and start again!

This card should be eligible for the following 
CHALLENGES:
Sweet Pea Stampers – boys/men
Open-Minded Crafting  - #14 – Water, water everywhere
Pile it On #28 – Monochromatic
Crafting from the Heart #27 – ATG
Through the Craft Room Door – ATG
SUPPLIES

IMAGES:  The focal image and world on the inside - both by Magenta; the sentiment is Sunlight Impressions. 
PAPER:  Neenah Classic Crest Solar White 80# Cover Wt. used for the images; base CS & the mats are from stash.
EMBELLISHMENTS: Copper brads are from stash.
INKS: Distress Inks used to ink all the edges

May you create wildly and color with abandon whenever it amuses you!  ~ginny

Thursday, July 10, 2014

An Aerocruiser for Lady B...


An Aerocruiser for Lady B provided by Rick St dennis
A little Steampunk makes me smile!  I spent a lot of time on this one trying to figure out exactly what I wanted to do with her.  You can not see the dimension of the balloon or the heart here - but take it from me, they are fussy cut, sculpted and elevated.  I am pleased with the results! 

This is my DT card for Aud Sentiments' Challenge 110.  It is an "Anything Goes" theme but this go around we are having a DT Call too!  If you have ever had an itch to try out for a Design Team slot, now is the time!  Go to Aud Sentiments for details on expectations and benefits of a DT and then all you have to do is submit a card and put DT after your name. 

TECHNIQUE
[Note: specific information on supplies and sources will be found below under “Supplies”.]
  • I used a "Paper Sculpting Technique" that in this instance consists of: printing the focal image two times, coloring, fussy cutting the heart and balloon, sculpting the individual pieces [dry embossing each individual piece from the back using a large ball tool] and layering with foam tape to maintain the dimension. 
  • All the coloring was done with Copics except for the balloon - on which I used Colorbox Chalk ink.
  • The sentiment 'imagine' was rubber stamped on the corner
  • A Calligraphy Fineliner from ArtQuest was used both to apply the Duo Glue for the silver foil added and for applying the opaque white Copic paint to select areas of the basket and the heart.
  • I finished the card by embossing lines into the base CS using a Scor-It - you can see one line to the left of the focal image in this picture on the right - there are two more below the image that can not be seen.
This card should be eligible for the following 
CHALLENGES:
Through the Craft Room Door – ATG
Crafting from the Heart #26 – ATG TOP FIVE
Top Tip Tues – Magical
Sweet Stamps #177 – Gold and/or Silver
Crafty Sentiments – ATG
MarkerPOP Challenge #47 – ATG
SUPPLIES
IMAGES:  The focal image is from rick St dennis ; Sentiment is from a pre-inked stamp set called MiniZ.
PAPER:  Neenah Classic Crest Solar White 80# Cover Wt. used for the images; the mats are from stash.
INKS: Colorbox Chalk ink used on the balloon; the images were printed on a Canon PIXMA printer & colored with Copics:


May you create wildly and color with abandon!  ~ginny